RACE TRANSPORTER 7 USER GUIDE
INTRODUCTION
ELECTRICAL CONTROL HUB
Głównym interfejsem użytkownika przyczepy jest „Electrical Control Hub” znajdujący się po wewnętrznej stronie przednich, lewych drzwi włazu. Ponadto przyczepą można sterować za pomocą zdalnego pilota z kluczykiem.
Electrical Control Hub składa się z trzech przełączników oraz wskaźnika poziomu naładowania baterii. Ponadto mieści jednostkę Bluetooth do monitorowania baterii przyczepy oraz szybkie złącze do podłączenia zasilacza baterii zasilanego z sieci.
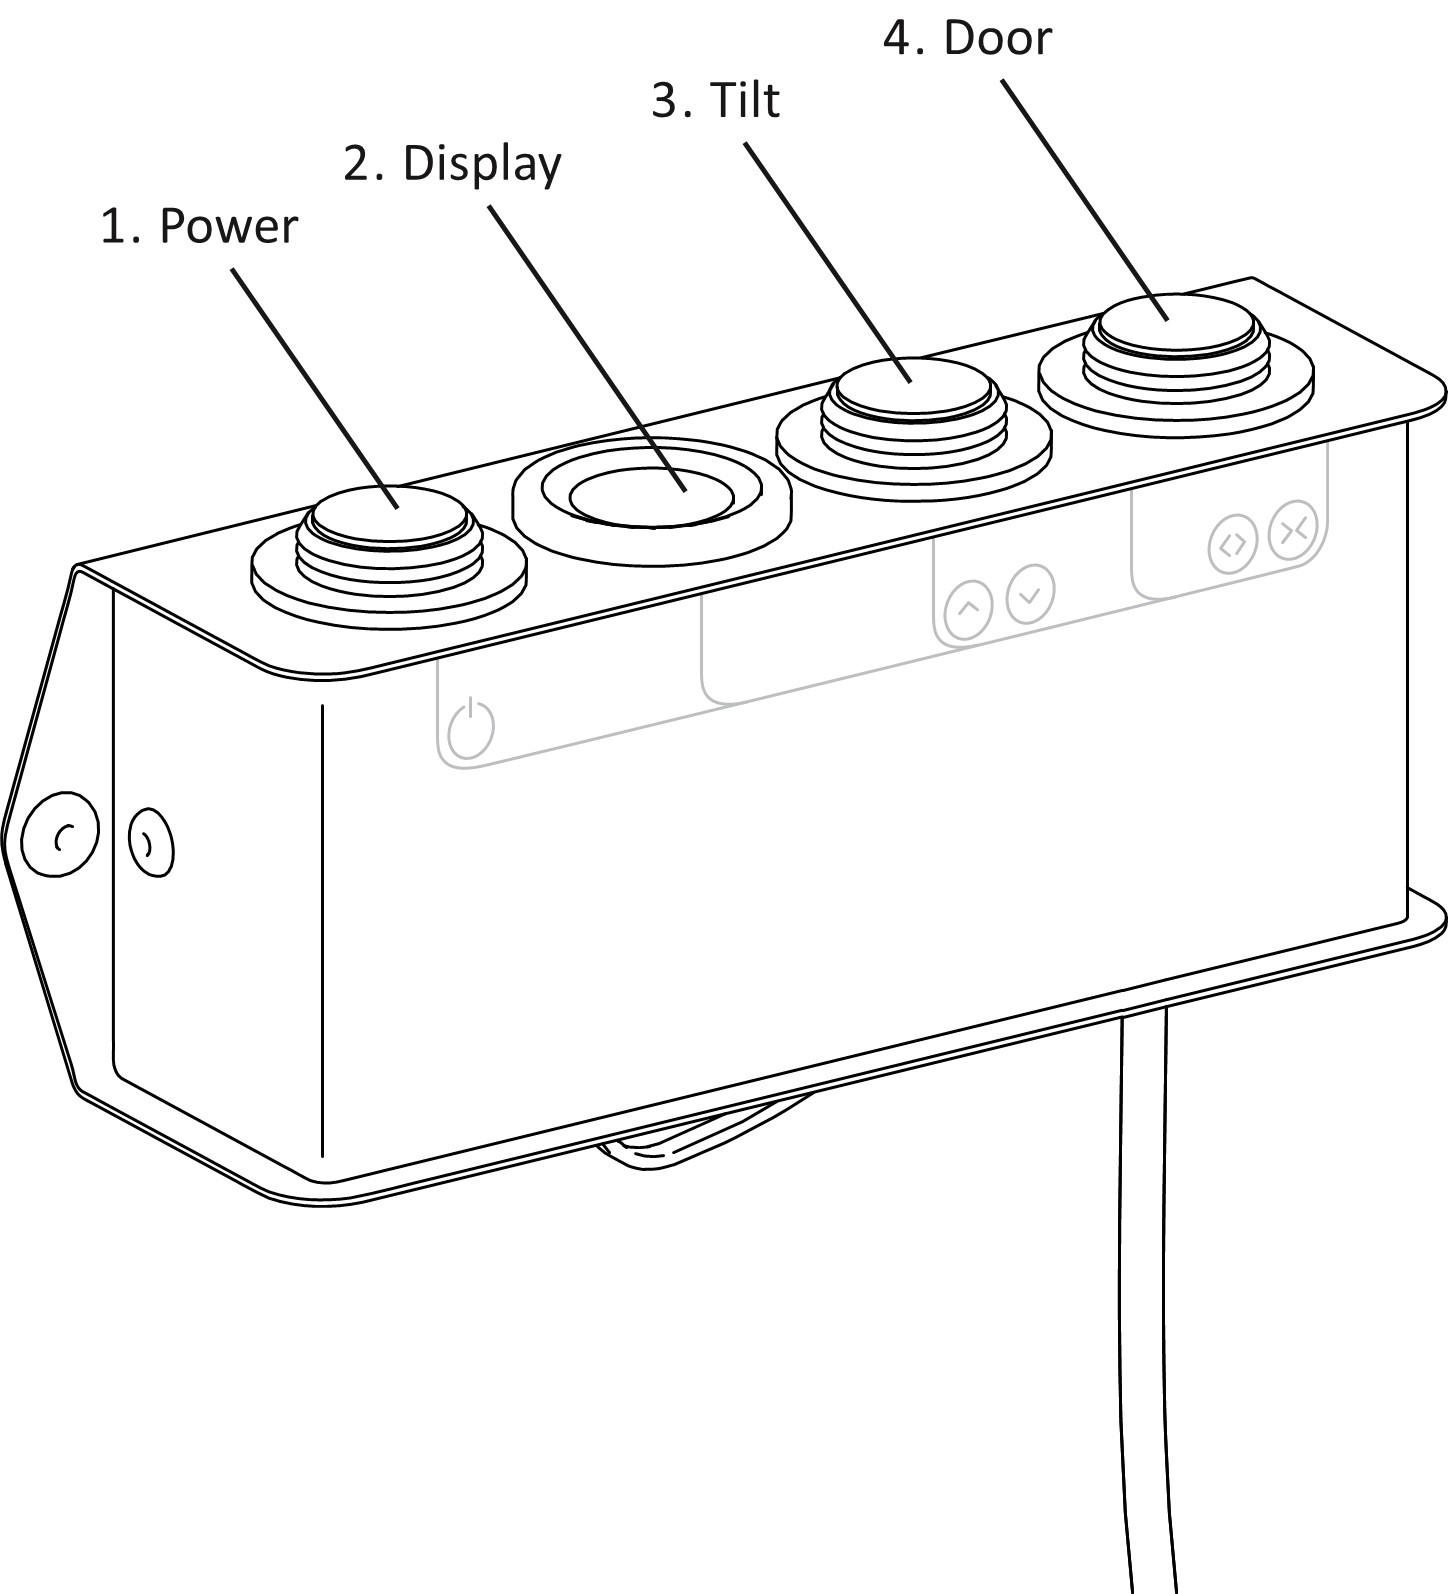
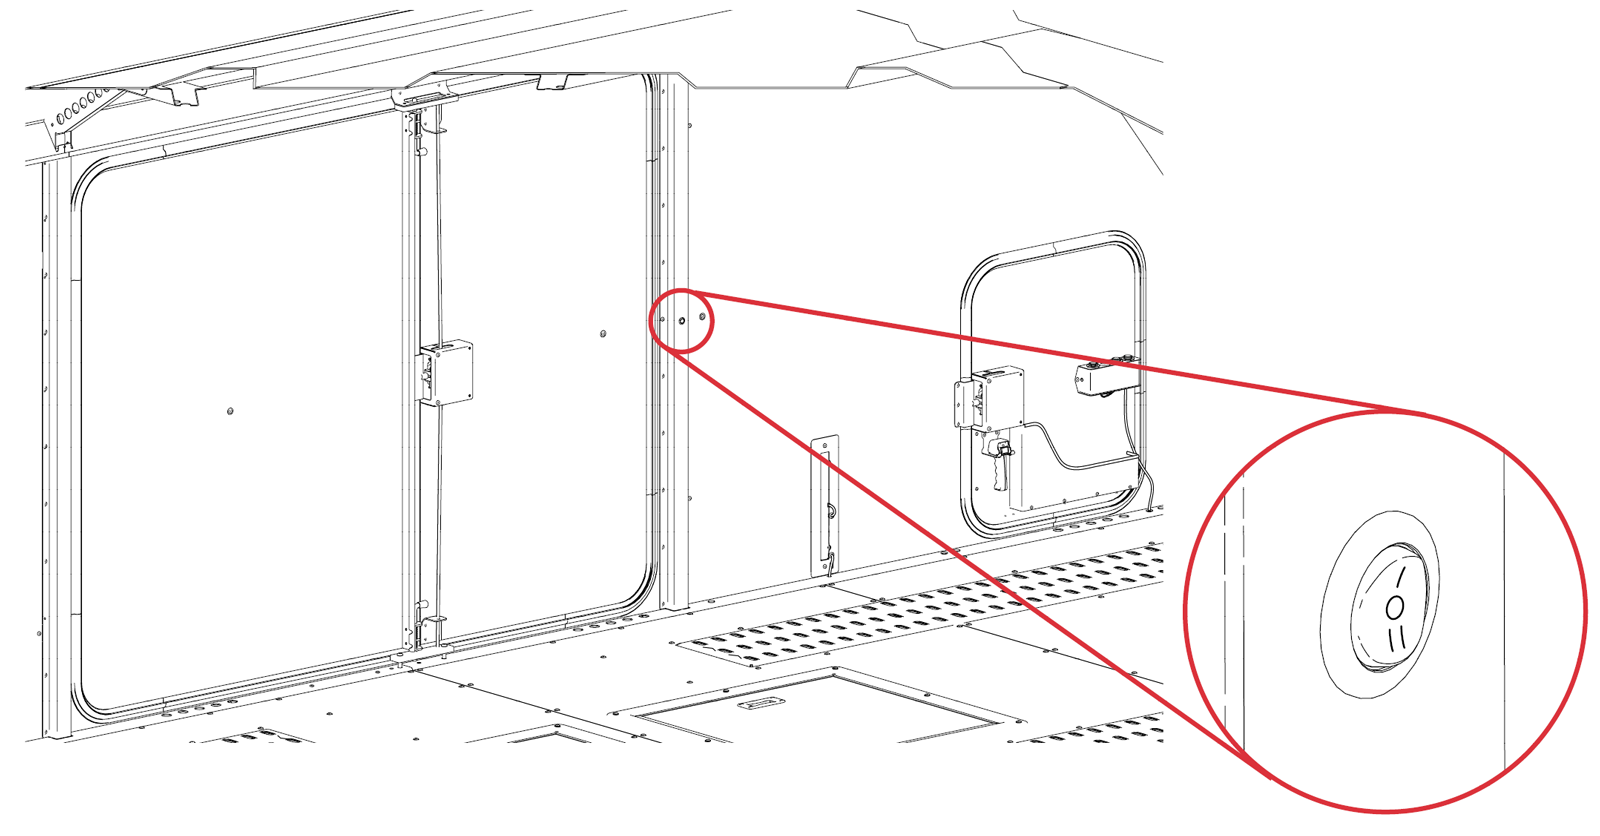
1: Główny wyłącznik przyczepy.
• Ten wyłącznik kontroluje zasilanie wszystkich systemów i funkcji wewnątrz przyczepy.
o Pozycja „0” oznacza WYŁĄCZONY, pozycja „1” oznacza WŁĄCZONY
o Przełącznik świeci się po włączeniu (pozycja ON)
Model RT7 ma zasilanie oświetlenia i innych obwodów pobierane z pojazdu holującego. Zapewnia to pełną funkcjonalność oświetlenia przyczepy oraz umożliwia ładowanie podtrzymujące baterii przyczepy podczas jazdy. Po włączeniu głównego wyłącznika przyczepy zostaje odłączone zasilanie pobierane z pojazdu holującego, co zapobiega przeciążeniu systemów elektrycznych pojazdu (pełne obwody oświetlenia zewnętrznego przyczepy pozostają nienaruszone).
Zalecamy, aby podczas holowania przyczepa była w stanie WYŁĄCZONYM, co pozwoli na ładowanie podtrzymujące baterii i uniknięcie niezamierzonego uruchomienia funkcji przyczepy. Zalecamy również pozostawienie przyczepy w stanie WYŁĄCZONYM podczas przechowywania, aby oszczędzić żywotność baterii.
2: Wskaźnik poziomu baterii.
• Ten wskaźnik aktywuje się tylko, gdy główny wyłącznik przyczepy jest w pozycji WŁĄCZONY. Wyświetla odczyt napięcia na środku oraz trzykolorowy wskaźnik stanu naładowania w otaczających polach wyświetlacza. *
* Pokazywane napięcie może być niższe niż rzeczywiste, jeśli bateria jest obciążona, np. gdy włączone jest oświetlenie wewnętrzne lub działają funkcje przyczepy takie jak przechył, tylne drzwi lub wciągarka.
3: Przełącznik kołyskowy – obsługa przechyłu
• Gdy główny wyłącznik przyczepy jest włączony, ten przełącznik kołyskowy steruje funkcją przechyłu przyczepy — w górę i w dół. (patrz także obsługa zdalna)
4: Przełącznik kołyskowy – obsługa tylnych drzwi
• Gdy główny wyłącznik przyczepy jest włączony, ten przełącznik kołyskowy steruje otwieraniem i zamykaniem elektrycznie sterowanych tylnych drzwi. (patrz także obsługa zdalna)
BATTERY CHARGING
Podłączenie ładowarki akumulatora sieciowego.
Model RT7 jest wyposażony w ładowarkę akumulatora sieciowego o natężeniu 4A. Dzięki 8-stopniowemu cyklowi ładowania, ładowarka ta zapewnia inteligentny proces ładowania, co tworzy optymalne warunki dla Twojego akumulatora. Proces ładowania jest kontrolowany przez wbudowany mikroprocesor.
Ładowarka posiada wbudowaną ochronę przed iskrzeniem, zwarciem, przegrzaniem oraz odwrotną polaryzacją.
Ładowarka akumulatora ma również wbudowane połączenie Bluetooth, które umożliwia bezprzewodowy monitoring cyklu ładowania. Zeskanuj kod QR na elektrycznym panelu sterowania przyczepy, aby zainstalować i połączyć się z aplikacją. Kompatybilna z IOS i Android. *
*Jest to aplikacja firm trzecich; BJT nie ponosi odpowiedzialności za jej utrzymanie, użytkowanie i zastosowanie.
REMOTE CONTROL
RT7 jest wyposażony w pilot zdalnego sterowania 4-funkcyjny. Posiada 4 przyciski do sterowania funkcjami przechyłu oraz tylnych drzwi przyczepy.
Aby pilot zdalnego sterowania był aktywny, przyczepa musi być w stanie WŁĄCZONYM – kontrolowanym przez główny wyłącznik na Elektrycznym Centrum Sterowania w przyczepie.
Biała część pilota steruje przechyłem (do góry/na dół), natomiast czerwona część pilota steruje tylnymi drzwiami (otwieranie/zamykanie).
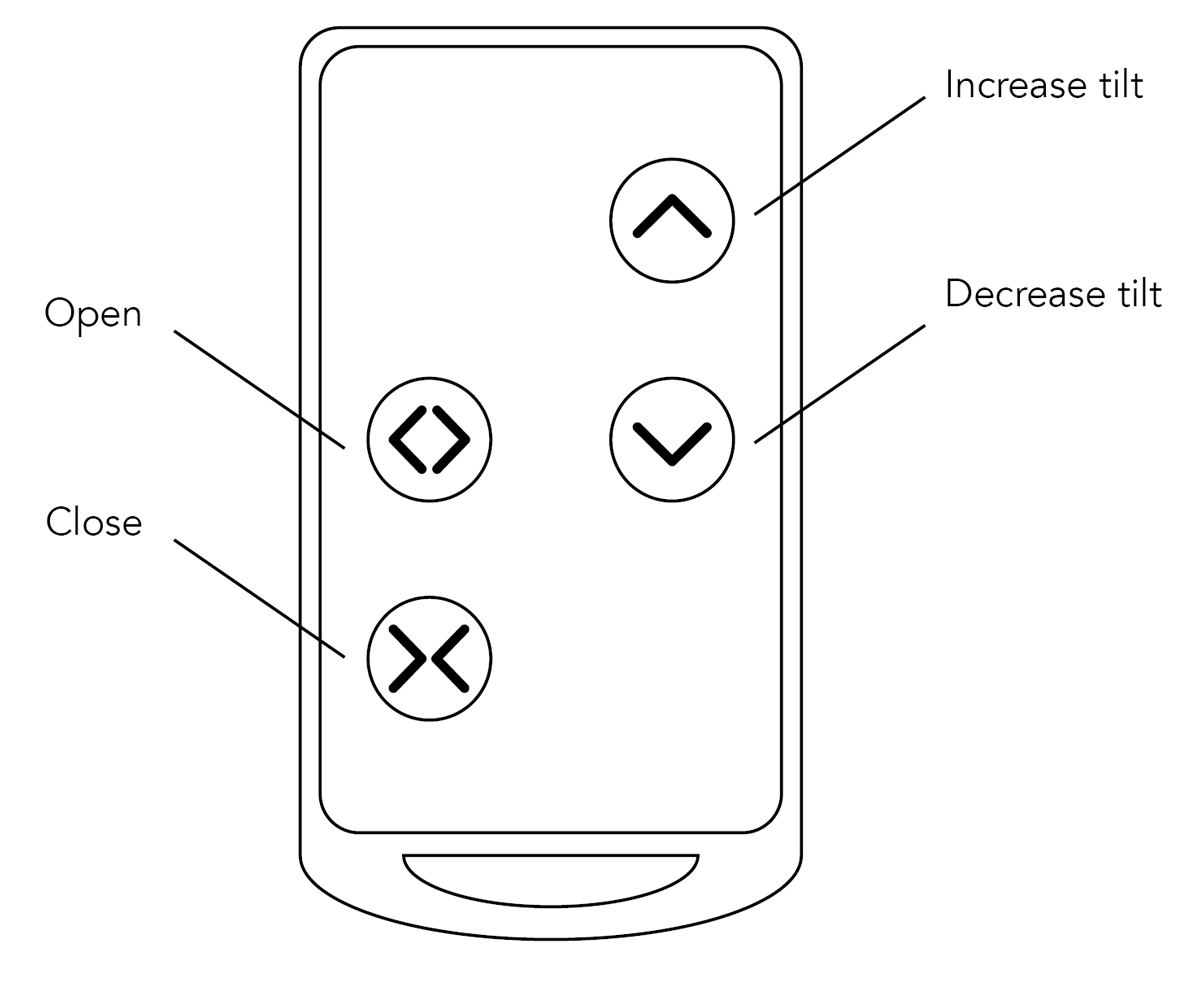
• Podczas korzystania z dowolnej funkcji z przyczepy będzie dochodził przerywany sygnał dźwiękowy ostrzegawczy.
• Zarówno kontrola przełącznikiem (elektryczne centrum sterowania), jak i sterowanie pilotem odbywają się jedynie przez chwilowe przytrzymanie przycisku. Oznacza to, że przycisk/przełącznik musi być przytrzymany, aby funkcja mogła działać.
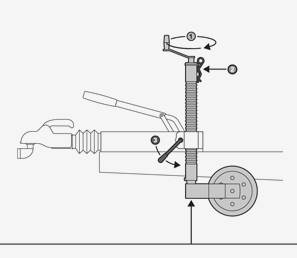
RT7 TRAILER OPERATION PROCEDURE
The trailer can be used in either fixed bed or tilt bed configuration, depending on the required application.
If the tilt function is to be used, the trailer must first be switched on using the Master Switch on the Electrical Control Hub. The trailer can then be tilted using either the rocker switch on the Electrical Control Hub or the tilt up button on the remote-control fob. The warning beeper (intermittent beeps) will sound during the tilt operation.
The trailer should be tilted until the rear skid wheels contact the ground. This provides maximum stability for loading and reduces any undue stress on the chassis. Once the skid wheels are on the ground, the button should be released, and the tilt action stopped even if there is still travel available on the actuator. Tilting the trailer more than required risks damage to the tilt hardware and provides no advantage to loading angle.
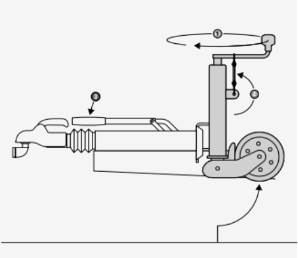
The trailer rear door can now be opened. This is achieved either by the rocker switch on the Electrical Control Hub or the door open button on the remote-control fob. Once again, the warning beeper will sound during operation of the rear door. The door must be fully lowered until it contacts the ground. Once the door has contacted the ground, operation of the actuator should be stopped immediately (button released). The rear door has a Patented safety mechanism to allow a degree of suspension movement of the trailer without risking damage to the door. If the button is not released as soon as the door hits the ground, then the range of motion of the safety mechanism is greatly reduced risking damage to the door and chassis hardware.
DO NOT put ANY load on the rear door while it is in motion or if it is not fully lowered to the ground. The door is not designed to lift any load other than the weight of the door.
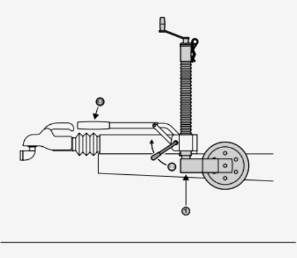
If the trailer tilt function is not required, then the rear door can just be lowered to the ground as the first step. The same operation guidelines as above regarding stopping motion as soon as the door hits the ground still apply. Once the rear door is open, the tilt function of the trailer is disabled. This is to protect the door from damage. Activating the tilt function with the rear door open will result in an Alarm sound (constant). The rear door should be fully closed before subsequently activating the tilt as required.
After loading/unloading, it is suggested that the rear door is fully closed via either the rocker switch on the electrical control hub or the remote-control fob and then the trailer tilt lowered.
The door is fully closed when the actuator reaches the end of its travel and applies closing force (you will hear the tone of the motor change) the same applies to the tilt actuator.
The actuators have built in overload clutches, that may ‘click’ when they reach their ‘closing’ force. If the clutch kicks in during normal usage, then the actuators are seeing an overload.
If required, the trailer tilt function can be lowered before the rear door is closed – use this in the scenario where the loaded vehicle doesn’t have a handbrake for example. However, in this situation, as the trailer is lowered, the rear door will rise from the ground so care must be taken not to apply any load to the rear door in this state.
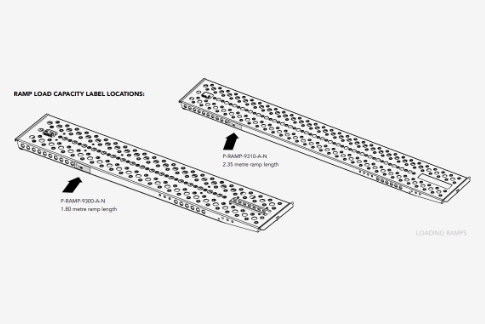
USE OF ASSISTOR RAMPS
The RT7 is optioned with either light weight aluminium assistor ramps, or ‘Race Ramp’ branded assistor ramps. Both options are stored on the sidewall in the rear of the trailer. Both of these assistor ramp types rely on the rear door resting onto the ‘landing pads’ of these ramps.
The rear door should be raised slightly using the rocker switch on the electrical control hub or the remote-control fob and these ramps positioned as desired before then lowering the door back down onto the ramps. DO NOT attempt to manually force the door up in order to fit the assistor ramps into position.
WINCH
Przyczepa jest wyposażona w elektryczną wciągarkę. Zasilana jest przez pokładowy akumulator przyczepy. Przyczepa musi być włączona za pomocą głównego przełącznika na panelu sterowania elektrycznego. Wciągarka jest zasilana poprzez wtyk Andersona na przednim poprzecznym elementie ramy przyczepy.
Wciągarka posiada ustawienie „freewheel”, które umożliwia ręczne wyciąganie syntetycznej liny. Szczegółową instrukcję obsługi wciągarki znajduje się w osobnym podręczniku.
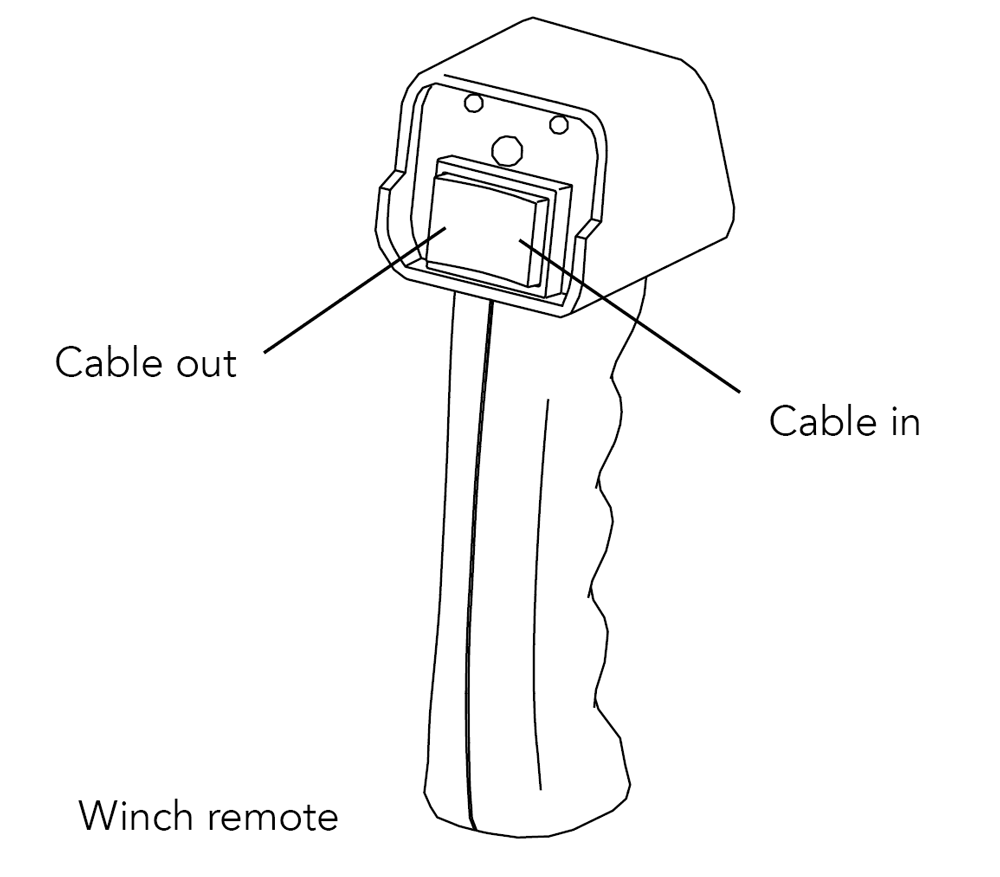
Wciągarka może być sterowana za pomocą pilotu obsługiwanego ręcznie, znajdującego się w kaburze również wewnątrz drzwi po lewej stronie. Kabel pozwala na przewodowe połączenie pomiędzy pilotem a wciągarką, lub pilot może być używany bezprzewodowo. Aby aktywować funkcję bezprzewodową, należy nacisnąć mały okrągły przycisk na przednim panelu pilota, a wskaźnik LED sygnalizujący bezprzewodowe połączenie się zaświeci.
Wciągarką steruje się następnie za pomocą przełącznika dźwigniowego na pilocie.
INTERIOR LIGHT SETTINGS
The RT7 is fitted with interior LED strip lighting, and exterior LED rear loading lamps. These are powered either by the on board trailer battery, or power can taken from the lighting circuit of the tow vehicle.
The lights are controlled by a switch on the left hand forward door post on the main side door of the trailer.
This switch has 3 positions:
• ‘0’ this turns interior and loading lights OFF• ‘I’ this takes power from the tow vehicle lighting circuit. A tow vehicle must be attached*, and the sidelights of this vehicle switched on (not daytime running lights) this function will allow power to the lights, regardless of the trailer Master Switch status.
• ‘II’ this takes power from the trailer on-board battery. The trailer Master Switch on the Electrical Control Hub must be in the ON position for the interior lights to receive power.
*Some modern vehicles see an imbalance of current draw when the trailer interior lights are on and powered from the tow vehicle. This can cause the vehicle to shut down the towing module resulting in all lighting functions being lost, or irregular behaviour of the trailer lights. in this situation, ensure to only run the trailer in the OFF (0) or on-board trailer power (II) setting.
OVER-RIDE FOR LOADING DOOR AND TILT BED
Zasilanie akumulatorowe:
W przypadku, gdy poziom naładowania akumulatora jest niewystarczający do zasilania siłowników/wciągarki, można podłączyć dodatkowe źródło zasilania (na przykład zestaw do rozruchu) do złącza Andersona na przednim poprzecznym elemencie ramy. Wbudowany akumulator przyczepy nadal musi mieć wystarczający ładunek, aby aktywować przekaźnik główny, który sprawi, że złącze Andersona stanie się aktywne.
Awaria siłownika:
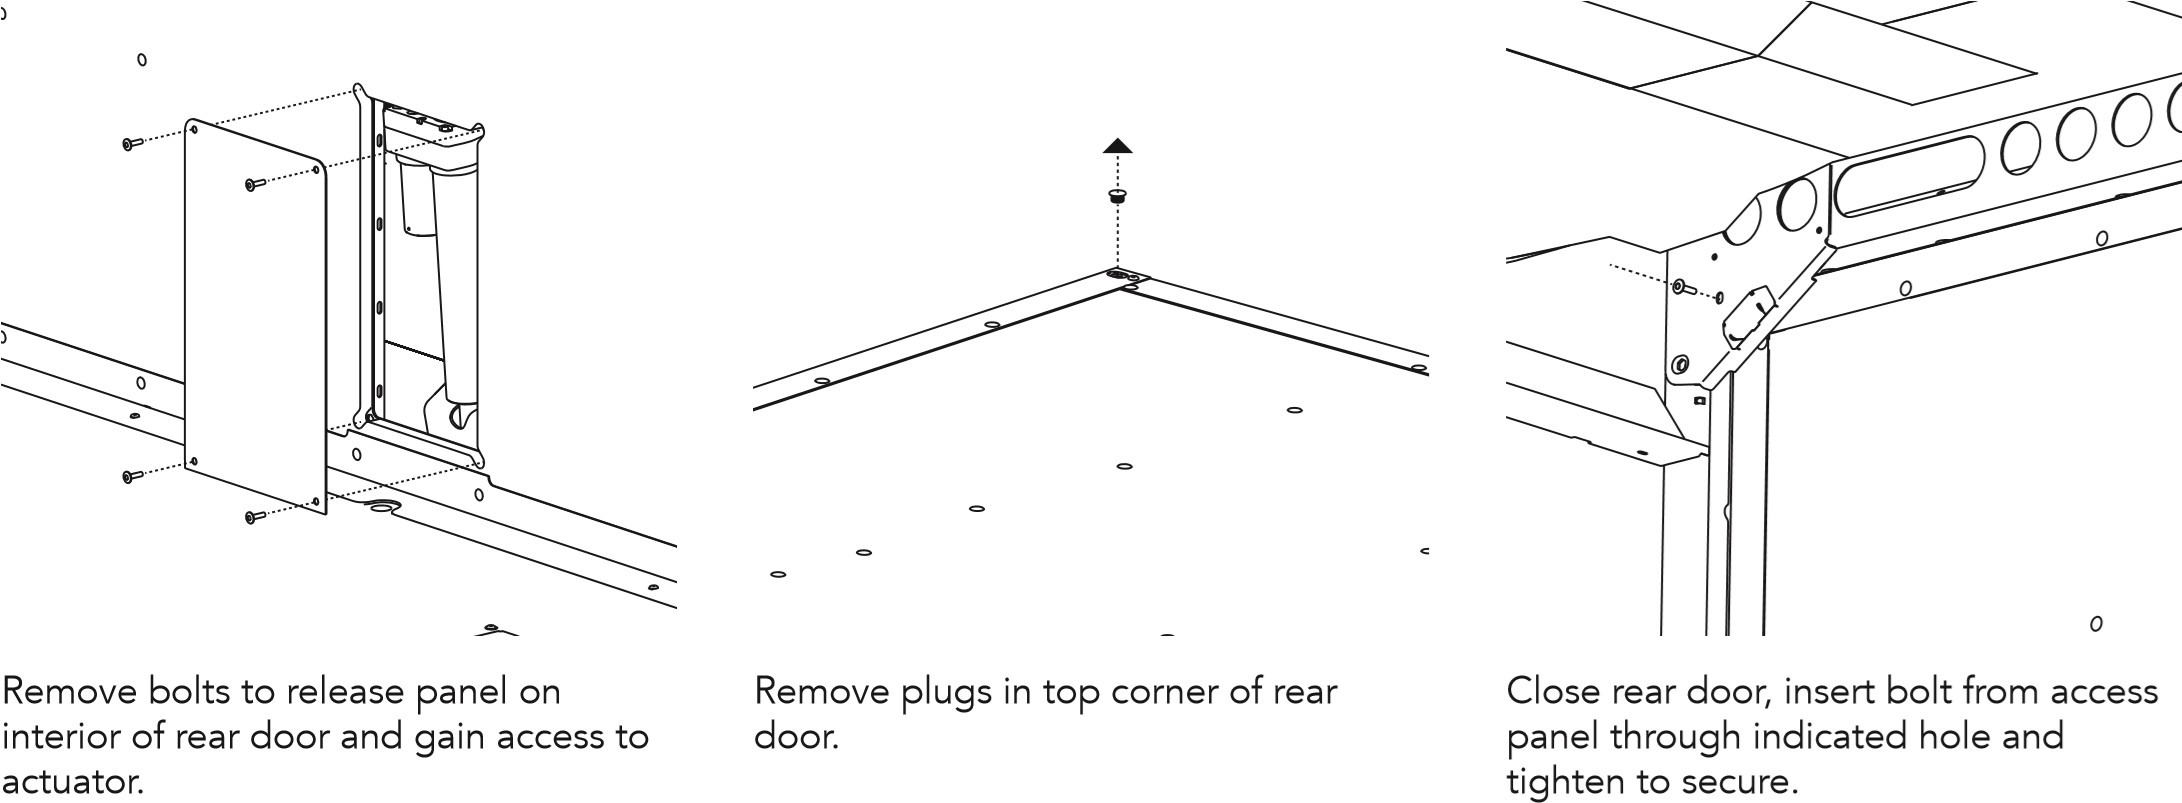
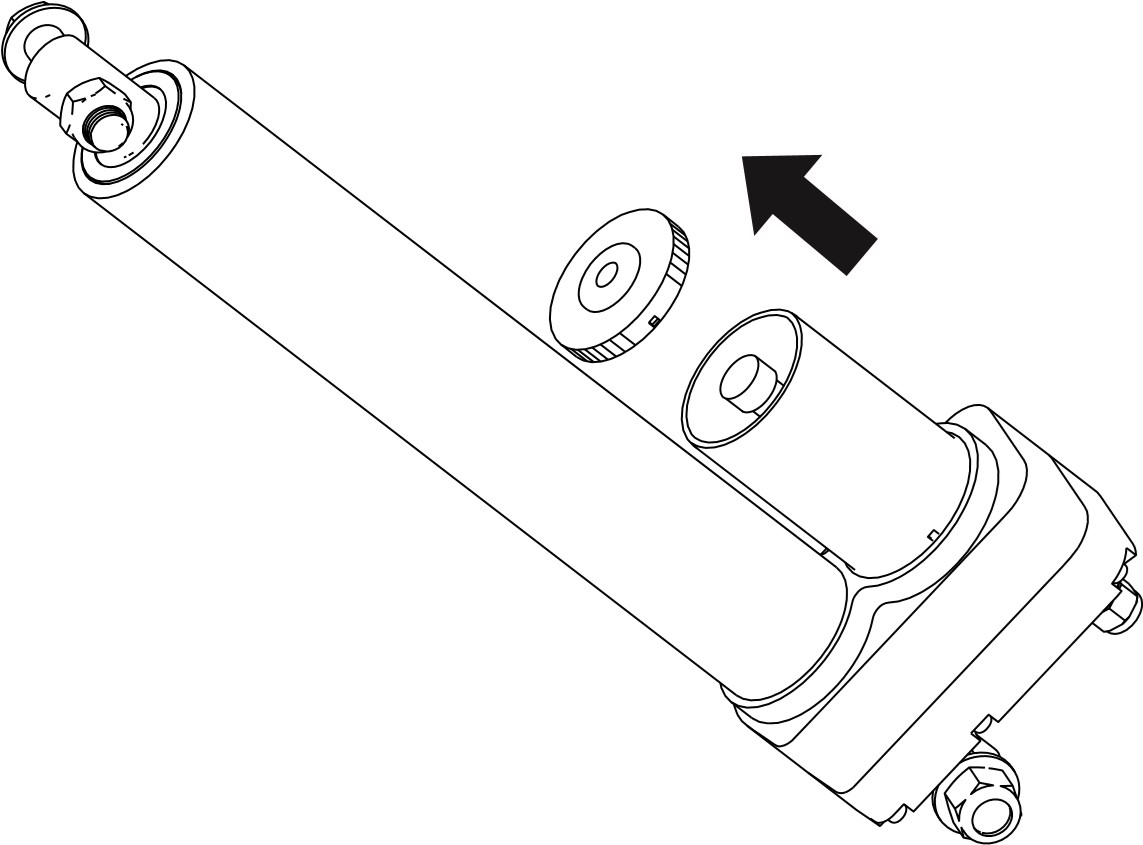
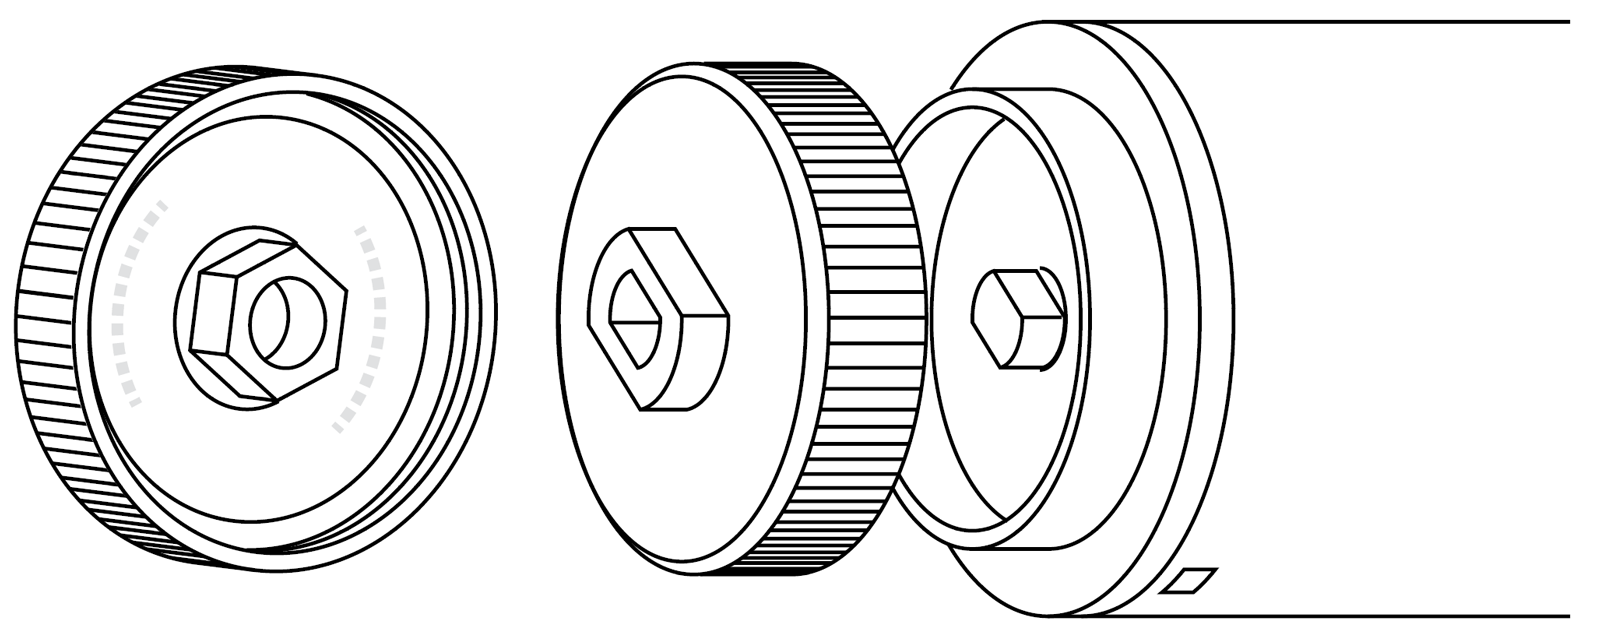
W nieprawdopodobnym przypadku awarii któregokolwiek z elektrycznych siłowników, oba mają wbudowaną manualną blokadę. Aby uzyskać dostęp do blokady, należy zdjąć osłonę z końca silnika, odwrócić tę osłonę i ponownie ją założyć. Osłona posiada „klucz” do ręcznego napędzania siłownika. Osłona zawiera również „imbus”, który umożliwia wprawienie siłownika w ruch za pomocą narzędzia zasilanego, co przyspiesza działanie.
W sytuacjach, gdy siłownik tylnej klapy uległ mechanicznemu uszkodzeniu lub w celu dodatkowego zabezpieczenia, klapę można zablokować za pomocą śrub od panelu dostępowego. Usuń plastikowe osłony z górnych narożników tylnej klapy, zamknij przyczepę, a następnie wkręć śruby w gwintowane otwory wskazane poniżej.