RACE TRANSPORTER 7 USER GUIDE
INTRODUCTION
ELECTRICAL CONTROL HUB
A tréler fő felhasználói felülete az „Elektromos vezérlőközpont”, amely a bal első ajtó belső oldalán található. Ezen kívül a trélert távirányítós kulcstartóval is lehet működtetni.
Az Elektromos vezérlőközpont három kapcsolóból és egy akkumulátor szint kijelzőből áll. Ezen felül tartalmazza a Bluetooth egységet a tréler akkumulátorának figyelésére, valamint a gyorscsatlakozó portot, amelyhez hálózati akkumulátor töltő csatlakoztatható.
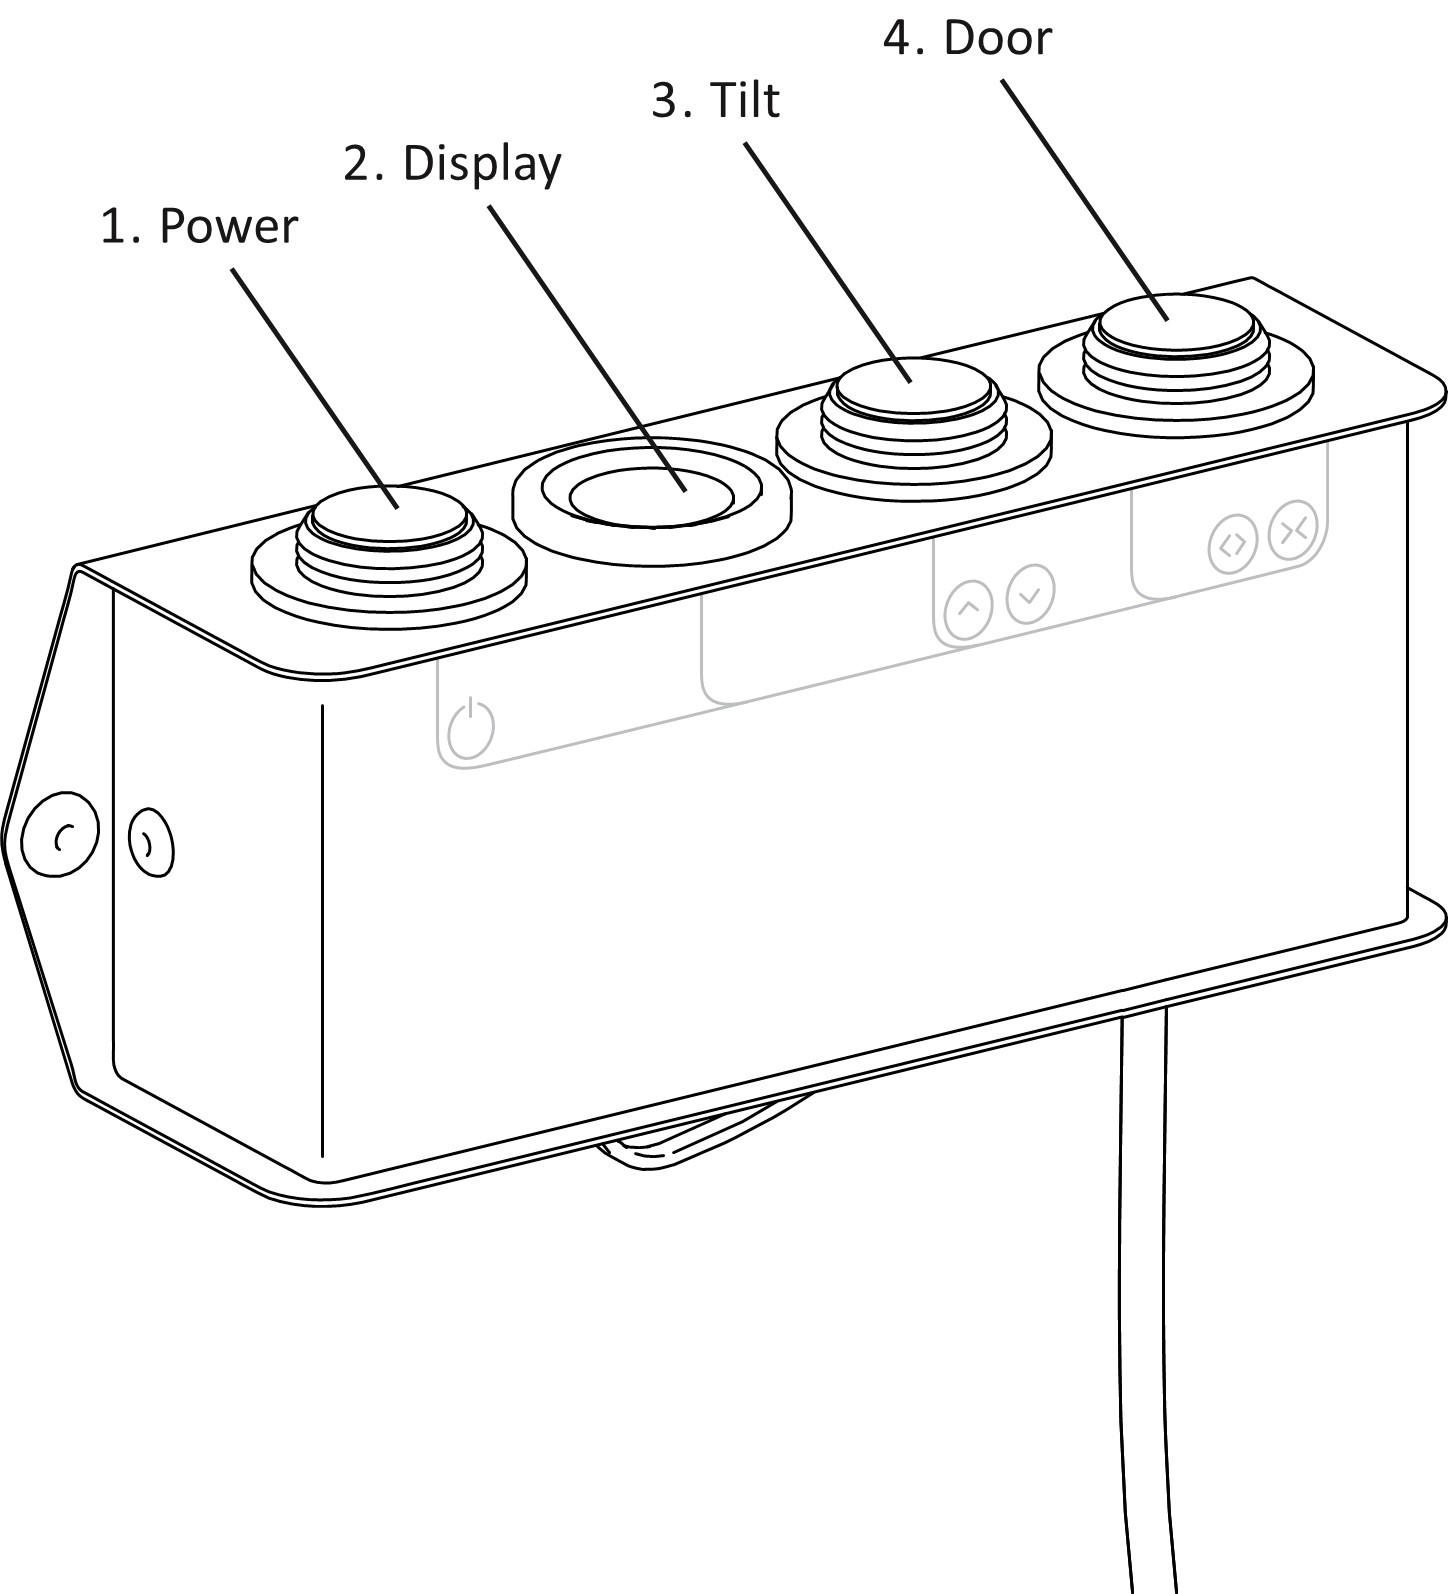
1: Fő trélermester kapcsoló.
• Ez a kapcsoló vezérli az összes rendszer és funkció áramellátását a tréleren belül.
o Az „0” állás KI, az „1” állás BE
o A kapcsoló világít, amikor BE van kapcsolva
Az RT7 modellnél a világítás és az áramellátás is a vontató járműről érkezik. Ez teljes trélervilágítási funkcionalitást biztosít, valamint lehetővé teszi az akkumulátor töltését vontatás közben csepptöltéssel. Amikor a trélermester kapcsoló BE van kapcsolva, az áramellátás a vontató járműről megszakad, így elkerülhető a vontató elektromos rendszerének túlterhelése (a teljes külső trélervilágítási áramkör érintetlen marad).
Ajánlott a tréler kikapcsolt állapotban tartása vontatás közben az akkumulátor csepptöltése és a véletlen funkcióműködés elkerülése érdekében. Ajánlott továbbá a tréler kikapcsolt állapota tároláskor az akkumulátor élettartamának megőrzéséhez.
2: Akkumulátor kijelző.
• Ez a kijelző csak akkor aktív, amikor a trélermester kapcsoló BE van kapcsolva. A kijelző közepén feszültségértéket mutat, körülötte pedig három színnel jelzi az akkumulátor töltöttségi állapotát. *
* A kijelzett feszültség alacsonyabb lehet a tényleges feszültségnél, ha terhelés van az akkumulátoron, például amikor a belső világítás működik vagy a tréler funkcióit használják, mint a döntés, hátsó ajtó vagy csörlő működtetés.
3: Billenőkapcsoló – döntés vezérlés
• A trélermester kapcsoló BE állásában ez a billenőkapcsoló vezérli a tréler platójának döntését felfelé és lefelé. (lásd még távirányítás)
4: Billenőkapcsoló – hátsó ajtó vezérlés
• A trélermester kapcsoló BE állásában ez a billenőkapcsoló vezérli az elektromosan működtetett hátsó ajtó nyitását és zárását. (lásd még távirányítás)
BATTERY CHARGING
Hálózati akkumulátortöltő csatlakozó.
Az RT7 4A-es hálózati akkumulátortöltővel kerül szállításra. Az 8 lépésből álló töltési ciklusával ez a töltő intelligens töltési folyamatot biztosít, így optimális állapotot teremt az akkumulátor számára. A töltési folyamatot beépített mikroprocesszor szabályozza.
A töltő beépített védelemmel rendelkezik szikraképződés, rövidzárlat, túlmelegedés és helytelen polaritás ellen.
Az akkumulátortöltő beépített Bluetooth kapcsolattal is rendelkezik, amely lehetővé teszi a töltési ciklus vezeték nélküli monitorozását. Olvassa be a trélert elektromos vezérlőközpontján található QR-kódot az alkalmazás telepítéséhez és kapcsolódásához. IOS és Android kompatibilis. *
*Ez egy harmadik fél alkalmazása, amelyért a BJT nem vállal felelősséget a karbantartásáért, használatáért és alkalmazásáért.
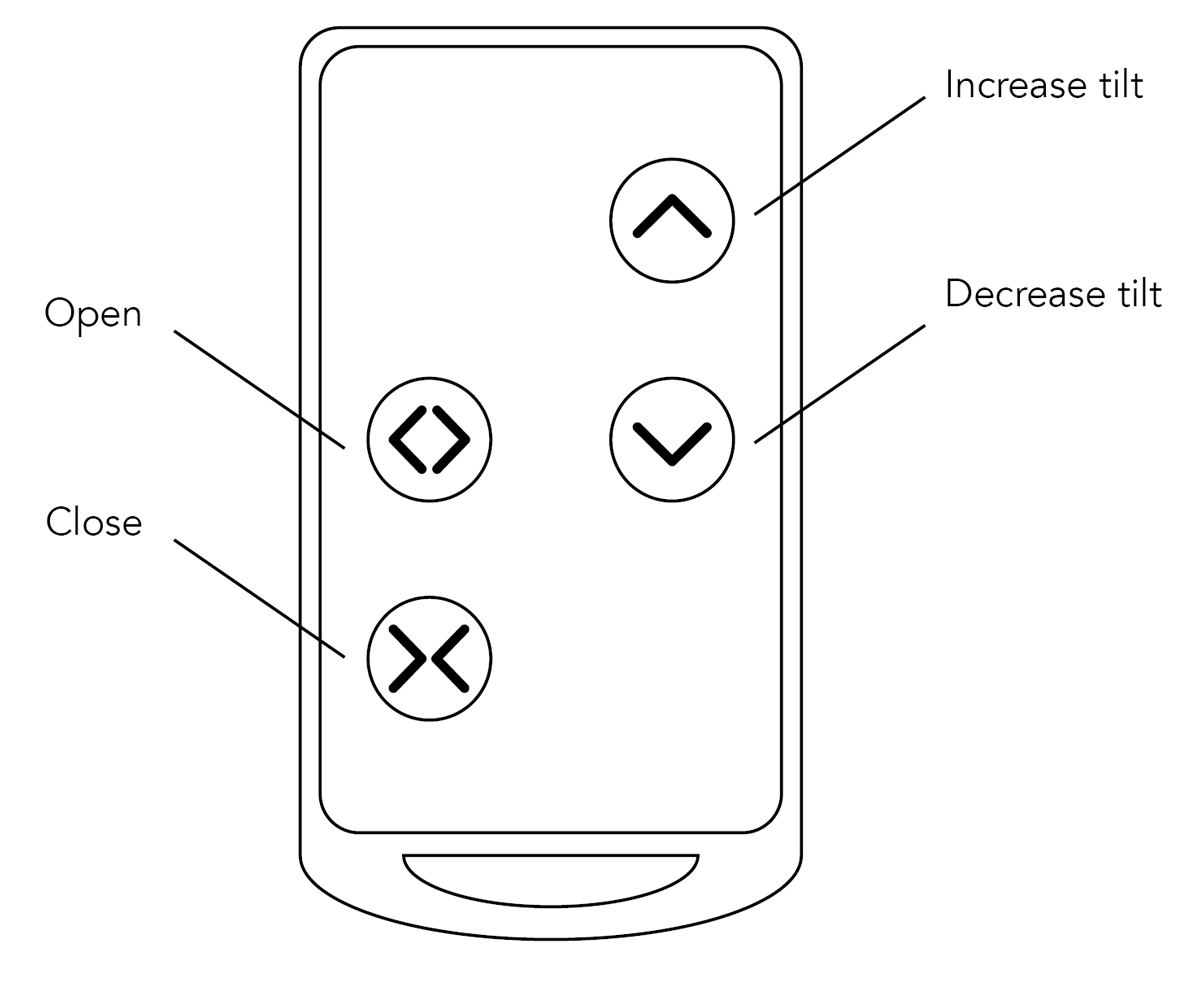
REMOTE CONTROL
Az RT7 távirányítójának 4 funkciógombja van. Ezek a gombok a trélertilt és a hátsó ajtó működtetésére szolgálnak.
Ahhoz, hogy a távirányító aktív legyen, a trélernek BE kell kapcsolt állapotban lennie – ezt a tréler Elektromos vezérlőközpontján belül található főkapcsoló szabályozza.
A távirányító fehér része a plató billentését (fel/le), a piros része a hátsó ajtó nyitását+zárását vezérli.
• Az összes vezérlés használata során a trélerből időközönként figyelmeztető sípoló hang hallatszik.
• A kapcsolóvezérlés (elektromos vezérlőközpont) és a távirányító gombjai csak pillanatnyi működésűek. Ez azt jelenti, hogy a gombot/kapcsolót folyamatosan nyomva kell tartani a funkció működtetéséhez.
RT7 TRAILER OPERATION PROCEDURE
The trailer can be used in either fixed bed or tilt bed configuration, depending on the required application.
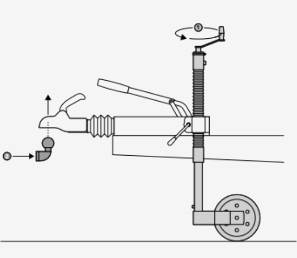
If the tilt function is to be used, the trailer must first be switched on using the Master Switch on the Electrical Control Hub. The trailer can then be tilted using either the rocker switch on the Electrical Control Hub or the tilt up button on the remote-control fob. The warning beeper (intermittent beeps) will sound during the tilt operation.
The trailer should be tilted until the rear skid wheels contact the ground. This provides maximum stability for loading and reduces any undue stress on the chassis. Once the skid wheels are on the ground, the button should be released, and the tilt action stopped even if there is still travel available on the actuator. Tilting the trailer more than required risks damage to the tilt hardware and provides no advantage to loading angle.
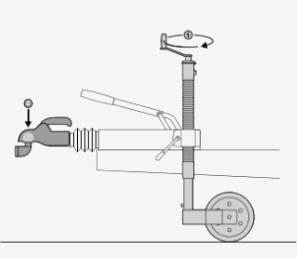
The trailer rear door can now be opened. This is achieved either by the rocker switch on the Electrical Control Hub or the door open button on the remote-control fob. Once again, the warning beeper will sound during operation of the rear door. The door must be fully lowered until it contacts the ground. Once the door has contacted the ground, operation of the actuator should be stopped immediately (button released). The rear door has a Patented safety mechanism to allow a degree of suspension movement of the trailer without risking damage to the door. If the button is not released as soon as the door hits the ground, then the range of motion of the safety mechanism is greatly reduced risking damage to the door and chassis hardware.
DO NOT put ANY load on the rear door while it is in motion or if it is not fully lowered to the ground. The door is not designed to lift any load other than the weight of the door.
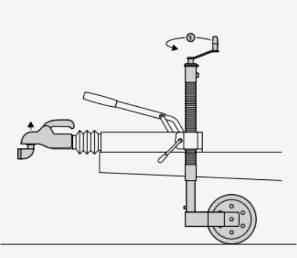
If the trailer tilt function is not required, then the rear door can just be lowered to the ground as the first step. The same operation guidelines as above regarding stopping motion as soon as the door hits the ground still apply. Once the rear door is open, the tilt function of the trailer is disabled. This is to protect the door from damage. Activating the tilt function with the rear door open will result in an Alarm sound (constant). The rear door should be fully closed before subsequently activating the tilt as required.
After loading/unloading, it is suggested that the rear door is fully closed via either the rocker switch on the electrical control hub or the remote-control fob and then the trailer tilt lowered.
The door is fully closed when the actuator reaches the end of its travel and applies closing force (you will hear the tone of the motor change) the same applies to the tilt actuator.
The actuators have built in overload clutches, that may ‘click’ when they reach their ‘closing’ force. If the clutch kicks in during normal usage, then the actuators are seeing an overload.
If required, the trailer tilt function can be lowered before the rear door is closed – use this in the scenario where the loaded vehicle doesn’t have a handbrake for example. However, in this situation, as the trailer is lowered, the rear door will rise from the ground so care must be taken not to apply any load to the rear door in this state.
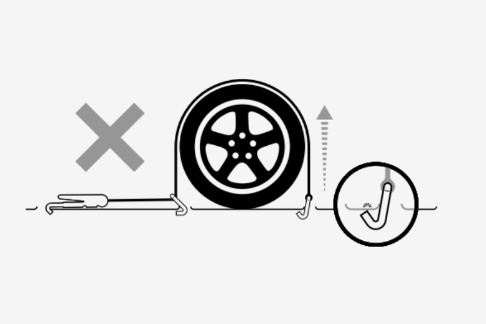
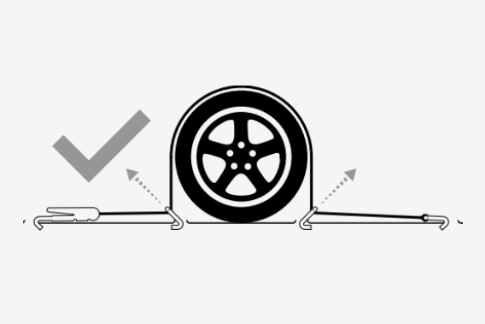
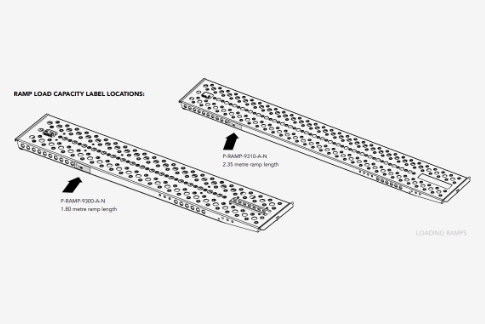
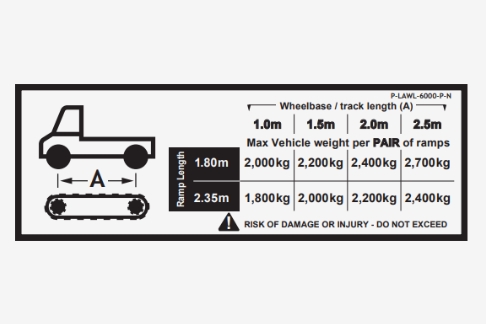
USE OF ASSISTOR RAMPS
The RT7 is optioned with either light weight aluminium assistor ramps, or ‘Race Ramp’ branded assistor ramps. Both options are stored on the sidewall in the rear of the trailer. Both of these assistor ramp types rely on the rear door resting onto the ‘landing pads’ of these ramps.
The rear door should be raised slightly using the rocker switch on the electrical control hub or the remote-control fob and these ramps positioned as desired before then lowering the door back down onto the ramps. DO NOT attempt to manually force the door up in order to fit the assistor ramps into position.
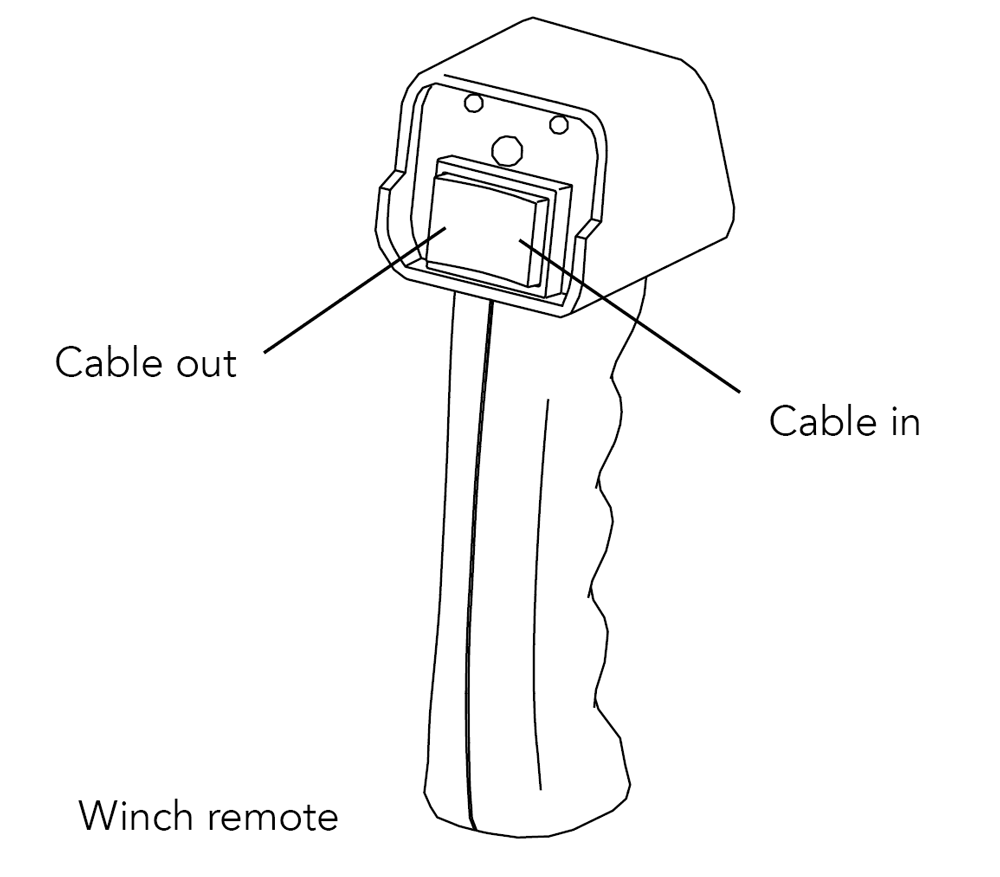
WINCH
A tréler elektromos csörlővel van felszerelve. Ezt a trélert saját fedélzeti akkumulátora táplálja. A trélert be kell kapcsolni a főkapcsolóval az elektromos vezérlőközpontban. A csörlőt az Anderson csatlakozón keresztül látja el árammal a tréler első keresztléce.
A csörlő rendelkezik „szabadonfutó” (freewheel) beállítással, amely lehetővé teszi a szintetikus kötél kézi kihúzását. A csörlő használatára vonatkozó részletes útmutató a különálló kezelési kézikönyvben található.
A csörlő a kezelőfogantyús távirányítóval vezérelhető, amely a bal oldali (LH) ajtó belső oldalán található tartóban helyezkedik el. Egy kábel segítségével vezetékes összeköttetés létesíthető a távirányító és a csörlő között, vagy a vezérlő vezeték nélkül is használható. A vezeték nélküli funkció aktiválásához nyomja meg a távirányító előlapján lévő kis kerek gombot, ekkor a vezeték nélküli LED jelzőfény világítani kezd.
A csörlő ezután a távirányító billenőkapcsolójával vezérelhető.
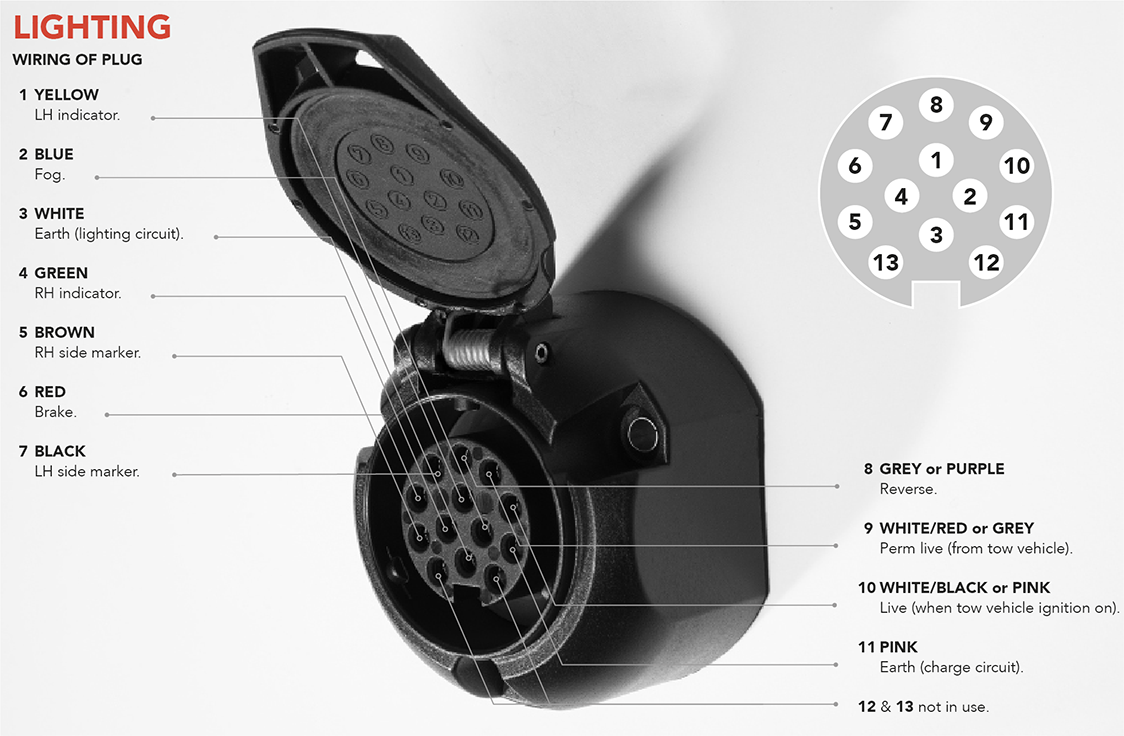
INTERIOR LIGHT SETTINGS
The RT7 is fitted with interior LED strip lighting, and exterior LED rear loading lamps. These are powered either by the on board trailer battery, or power can taken from the lighting circuit of the tow vehicle.
The lights are controlled by a switch on the left hand forward door post on the main side door of the trailer.
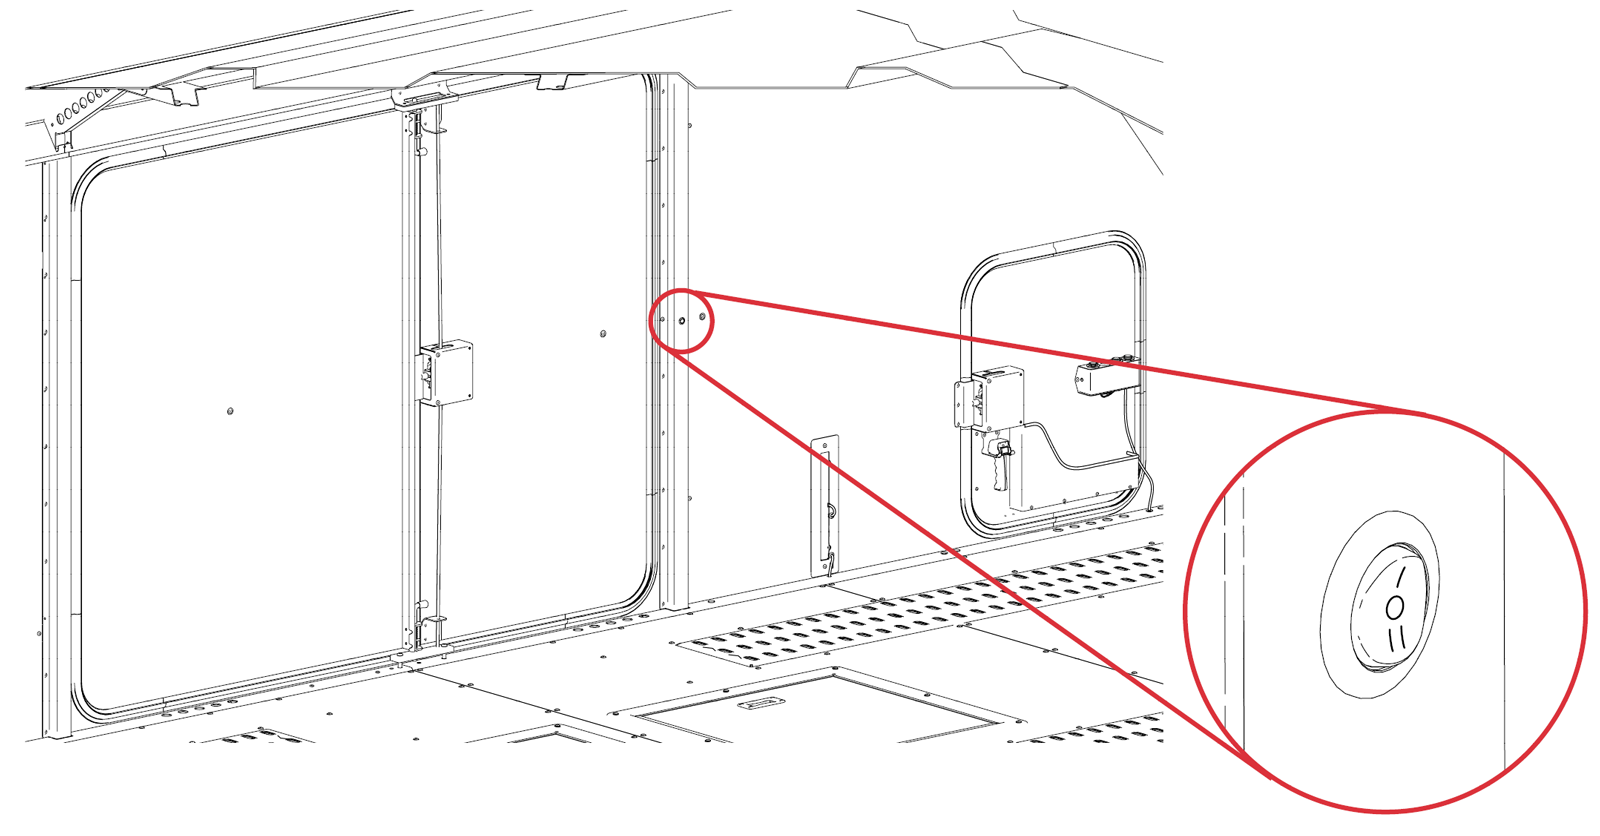
This switch has 3 positions:
• ‘0’ this turns interior and loading lights OFF• ‘I’ this takes power from the tow vehicle lighting circuit. A tow vehicle must be attached*, and the sidelights of this vehicle switched on (not daytime running lights) this function will allow power to the lights, regardless of the trailer Master Switch status.
• ‘II’ this takes power from the trailer on-board battery. The trailer Master Switch on the Electrical Control Hub must be in the ON position for the interior lights to receive power.
*Some modern vehicles see an imbalance of current draw when the trailer interior lights are on and powered from the tow vehicle. This can cause the vehicle to shut down the towing module resulting in all lighting functions being lost, or irregular behaviour of the trailer lights. in this situation, ensure to only run the trailer in the OFF (0) or on-board trailer power (II) setting.
OVER-RIDE FOR LOADING DOOR AND TILT BED
Akkumulátor tápellátás:
Amennyiben az akkumulátor töltöttségi szintje nem elegendő az aktuátorok/csörlő működtetéséhez, kiegészítő tápforrás (például indítóbatteria csomag) csatlakoztatható az első keresztmerevítőn található Anderson csatlakozóhoz. A fedélzeti trailer akkumulátornak azonban még mindig elég töltéssel kell rendelkeznie ahhoz, hogy aktiválja a fő relét, mely hatására az Anderson csatlakozó életre kel.
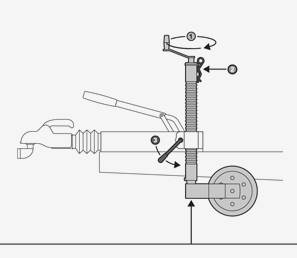
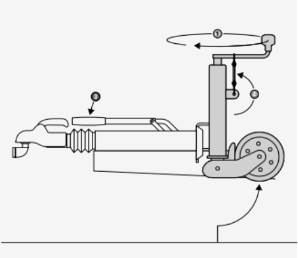
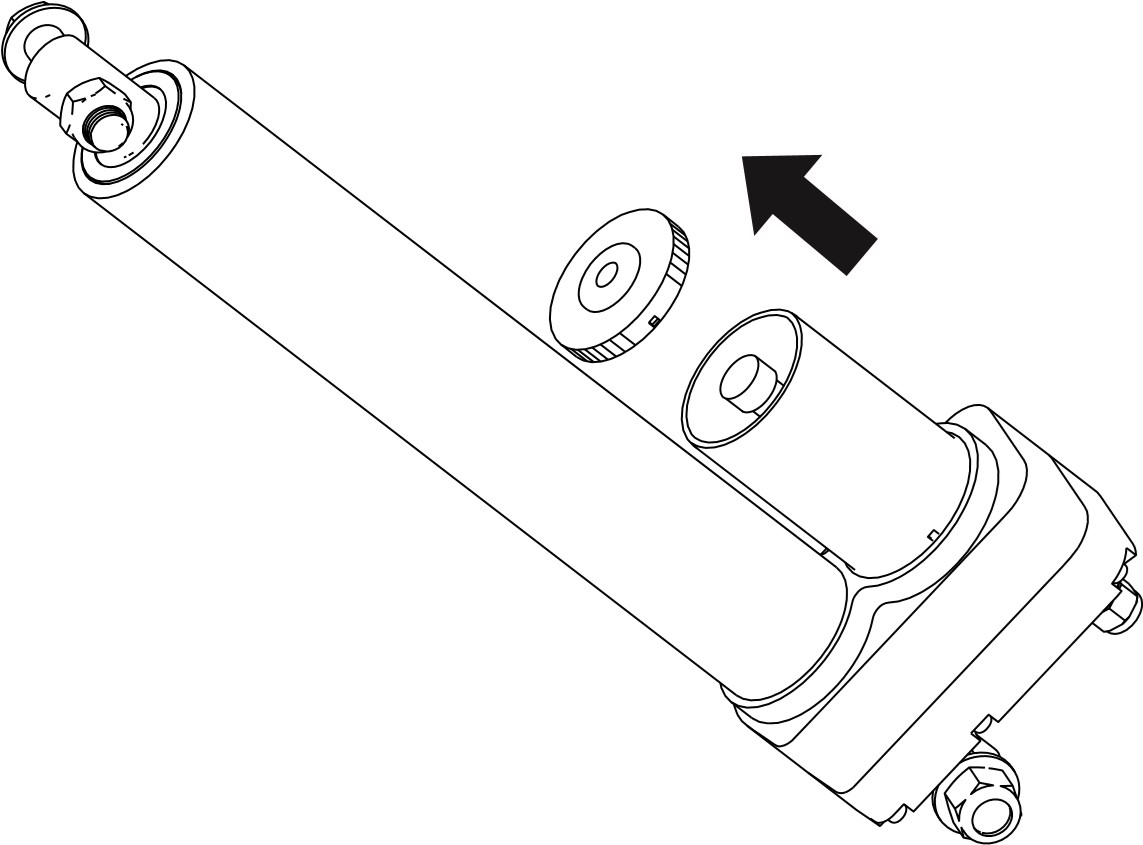
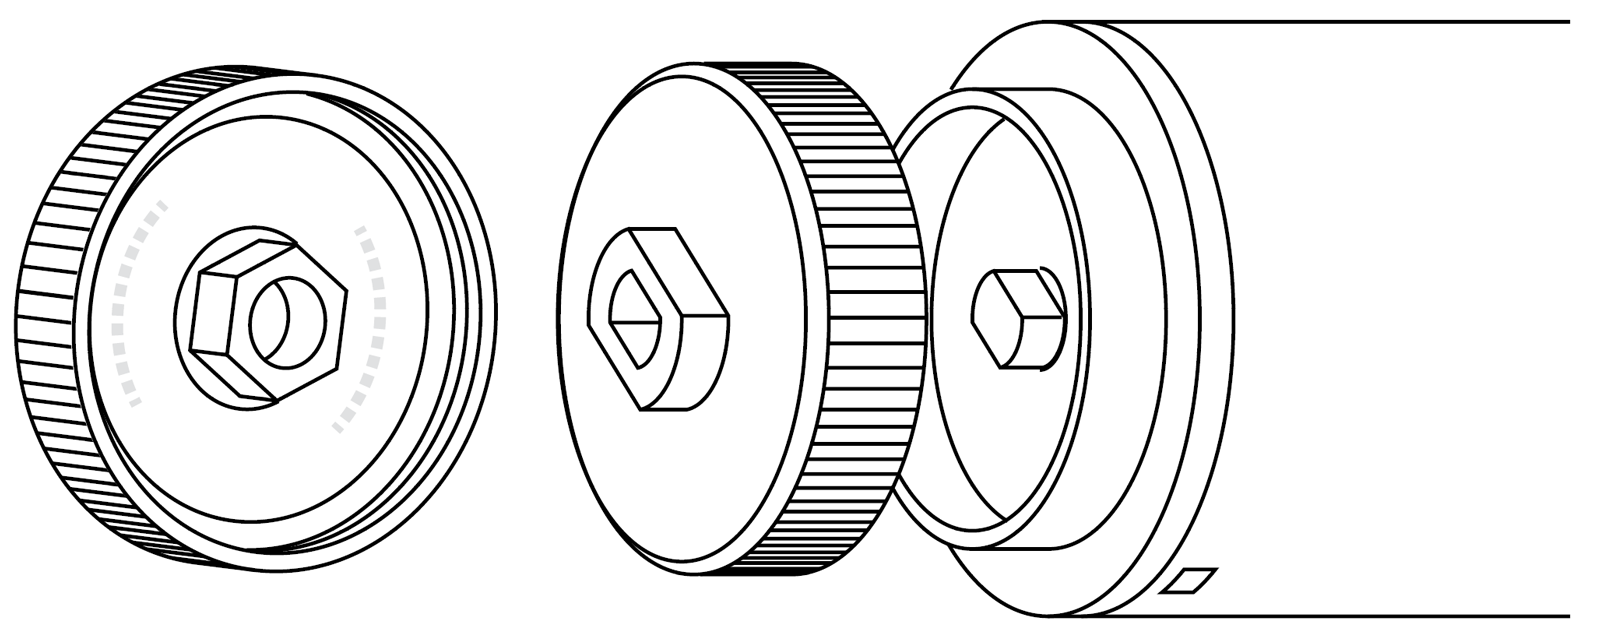
Aktuátor meghibásodás:
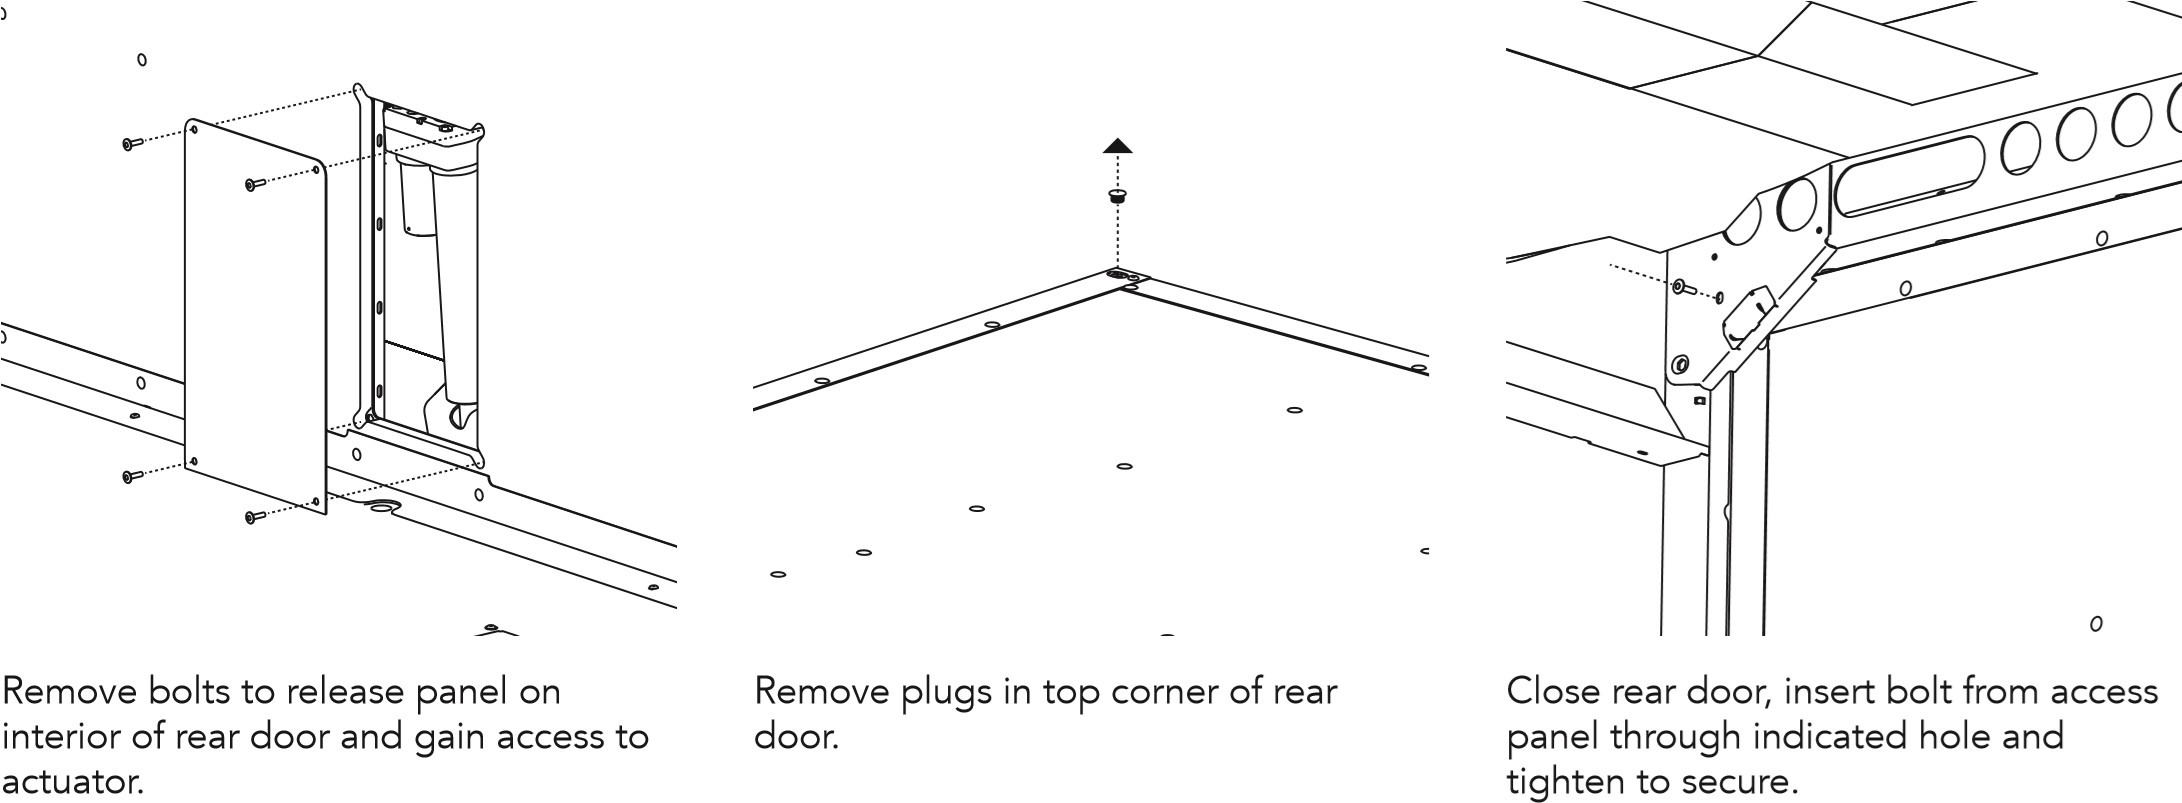
Rendkívül valószínűtlen esetben, ha bármelyik elektromos aktuátor meghibásodik, mindkettő beépített manuális felülírással rendelkezik. A felülírás eléréséhez távolítsa el a motorkivezetés végén található burkolatot, fordítsa meg ezt a burkolatot, majd helyezze vissza. A burkolaton található egy „kulcs”, mely segítségével az aktuátort kézzel is lehet hajtani. A burkolaton továbbá van egy hatszögletű (hex) kialakítás is, amely lehetővé teszi az aktuátor erőszerszámmal történő hajtását a művelet felgyorsítása érdekében.
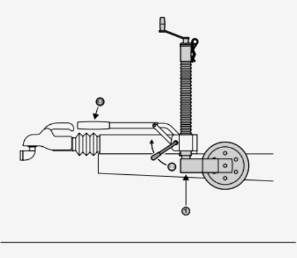
Ha a hátsó ajtó aktuátora mechanikusan meghibásodott, vagy extra biztonság érdekében, az ajtó rögzíthető rögzítőcsavarokkal az access panelből. Távolítsa el a műanyag takaróelemeket a hátsó ajtó felső sarkaiból, zárja be a trailert, majd helyezze be az alábbi ábrán jelzett menetfúrt furatokba a csavarokat.